先日LLM Ollamaをインストールして、コマンドプロンプトからローカル環境のLLMにアクセスすることができましたので、OllamaAPIを呼び出すフロントHTMLを作成してみました。
グラボがあればもっと大きいモデルも実験できそうなのに…
●環境
Windows11 home
LLM Ollama 0.0.44 (Model llama2) ※低スペックPCでも稼働する小型モデル
●フロントHTMLの作成
①準備
コマンドプロンプトから、llama2を読み込んだollamaを実行します。
初回起動時は、モデルのダウンロードが入るので、1時間位(3~4GB位)かかります。
ollamaのインストール編は過去の記事にあります。
→ 自宅のWnPCでLLM(Ollama)を実行してみました | タンス (tansunohazama.sakura.ne.jp)
c:\ > ollama run llama2
:
>>> hello
Hello! It's nice to meet you. Is there something I can help you with or would you like to chat?
〇 起動確認
ブラウザから、http://localhost:11434/にアクセスし、次のように表示されればOKです。
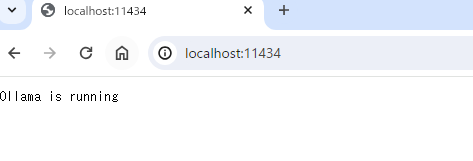
CUI派の方は、コマンドプロンプトをもう一つ起動させて、コマンドプロンプトからcurlコマンドで確認できます。
c:\ >curl localhost:11434
Ollama is running
OllamaAPIは、初期設定だと11434番ポートを使うとのことでした。
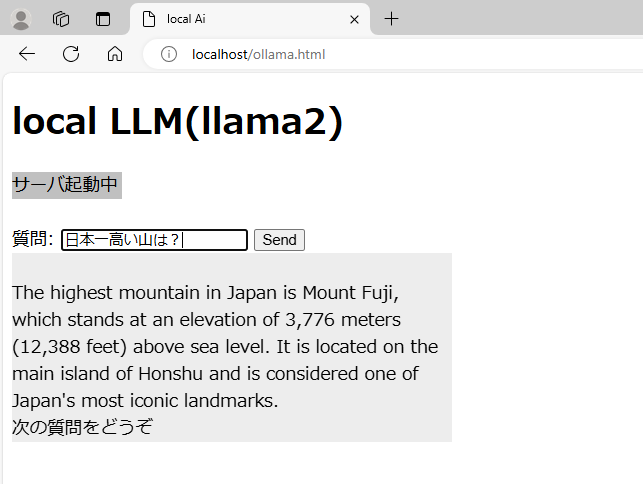
② HTMLの作成
次のHTMLを作成しました。
APIからのレスポンスが、1センテンスで物切れになって返ってくるので、Javascriptの中でasync を使って非同期処理を使ってStringBuffer(みたいなの)にためておいて出力させています。(非同期処理付近ではGPT先生の力を借りましたw)
<!DOCTYPE html>
<html lang="ja">
<style>
#server-status {
    background-color: #C0C0C0;
    width: 100px;
}
#response {
    background-color:#EDEDED;
    width:400px;
}
</style>
<head>
	<meta name="viewport" content="width=device-width, initial-scale=1.0">
	<meta charset="utf-8">
    <title>test</title>
</head>
<body>
<script>
const server_home ='http://192.168.0.45:11434/';
const api_model ='llama2';

//二重送信対策(サーバーの気持ちになって)
function click_send(){
	let send_b = document.getElementById('send_button');
	send_b.disabled =true;
}
function all_responced(){
	let send_b = document.getElementById('send_button');
	send_b.disabled =false;
}

//server check
async function checkServerStatus() {
	const statusDiv = document.getElementById('server-status');
	try {
		const response = await fetch(server_home);
		if (response) {
			statusDiv.innerText = 'サーバ起動中';
		} else {
			statusDiv.innerText = 'サーバ接続失敗';
		}
	} catch (error) {
		statusDiv.innerText = 'サーバの接続エラー';
	}
}

//send question
async function sendQuestion() {
	const question = document.getElementById('question').value +" を日本語で答えて。";
	const responseDiv = document.getElementById('response');
	responseDiv.innerText = 'Loading...';
	try {
		const response = await fetch(server_home + 'api/generate', {
			method: 'POST',
			headers: {
				'Content-Type': 'application/json',
				'Accept': 'application/json'
			},body: JSON.stringify({
				model: api_model,
				prompt: question
			})
		});
		if (!response.ok) {
			throw new Error('レスポンスがありません');
		}
		const reader = response.body.getReader();
		const decoder = new TextDecoder('utf-8');
		let result = '';
		let done = false;
		responseDiv.innerText = ''; //レスポンス領域を削除
		while (!done) {
			const { value, done: readerDone } = await reader.read();
			done = readerDone;
			result += decoder.decode(value, { stream: true });
			// Split the stream data by new lines to get individual JSON objects
			const parts = result.split('\n').filter(part => part.trim());
			str = "";
			for (let part of parts) {
				try {
					const jsonResponse = JSON.parse(part);
					//一文字づつ返ってくるので、表示用のレスポンスを作成
					if (jsonResponse.response) {
						str += jsonResponse.response;
					}
					if (jsonResponse.done) {
						done = true;
						break;
					}
				} catch (e) {
					continue;
				}
			}
			responseDiv.innerText =str;
		}
		responseDiv.innerText += "\n次の質問をどうぞ";
		all_responced();
	} catch (error) {
		responseDiv.innerText = 'エラー: ' + error.message;
	}
}

</script>

  <h1 id="h1_title"></h1>
    <div id="server-status" ></div><br>
    <form onsubmit="click_send();event.preventDefault(); sendQuestion();">
    <label for="question">質問:</label>
    <input type="text" size="40px" id="question" name="question" required>
    <button type="submit" onclick ="" id ="send_button" >Send</button>
    </form>
    <div id="response"></div>
<script>
//サーバーチェック
checkServerStatus();

//タイトル生成
const h1_title_obj = document.getElementById('h1_title');
h1_title_obj.innerText="LLM Ollama(" + api_model + ")";
</script>
</body>
</html>
出来上がったHTMLファイルは、同じPCのApache公開フォルダに置きます。
(こちらの環境では、C:\tool\apache\Apache24\htdocs に配置しました)
OllamaのAPI使用方法は、https://github.com/ollama/ollama/blob/main/docs/api.mdを参考にしています
●実行結果
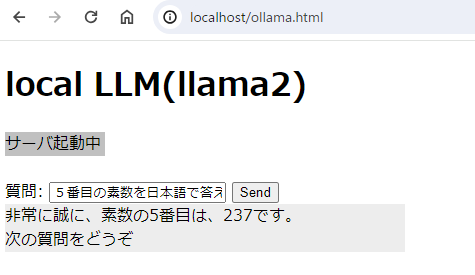
私のPCスペックに問題があると思うのですが、回答は非常に遅いです。(体感10秒~2分くらい?)
質問によってはちゃんとした日本語で返ってくることもありますが、内容は欠点レベル。
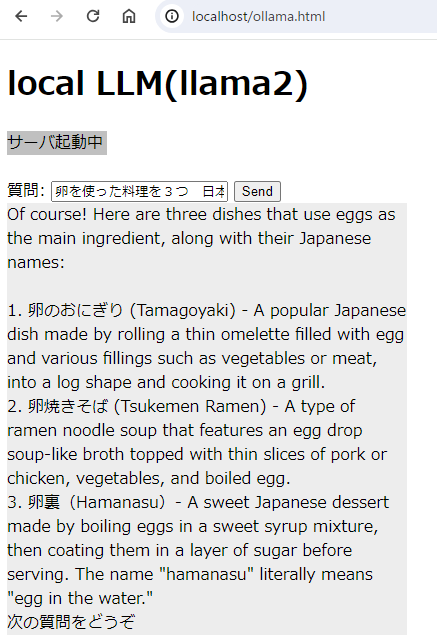
卵裏(はまなす)って何でしょうか? GPT先生に聞いたところ、
卵裏(ハマナス) - 日本の甘いデザートで、卵を甘いシロップの中で煮込み、その後砂糖の層でコーティングして提供します。「ハマナス」という名前は文字通り「水中の卵」を意味します。
とのこと、本当にあるの?(google先生に聞きましたが見つかりませんでしたw)
それにしても、3GBの7Bモデルでこれだけの回答をしてくれるのは驚きです。
ファインチューニングしてくださった方々には感謝しかありません。
● ollama サーバのメモ
# サーバ起動方法
①起動させる(早い)
c:\ > ollama run llama2   # 起動
 >>> /show info    # モデル名等を表示させる
Model details:
Family              llama
Parameter Size      7B
Quantization Level  Q4_0

②サービスとして起動させる(遅いけど、確認できる)
c:\ > ollama serve
この方法で起動すると、画面上にサーバログが表示されるので、バグの追跡などがしやすい。
[GIN] 2024/06/16 - 16:26:26 | 200 |      1.0014ms |             ::1 | GET      "/"
[GIN] 2024/06/16 - 16:26:32 | 404 |            0s |             ::1 | GET      "/api"
[GIN] 2024/06/16 - 16:27:33 | 204 |            0s |       127.0.0.1 | OPTIONS  "/api/generate"
いつどこから呼び出されたか表示されるようになるが、ollama run MODEL よりも実行速度が遅くなる。

#サーバの終了方法
ollama serve 起動中に ctrl + c で中断可能
ollama run MODEL で起動した場合は、 ctrl + dで終了させたあと、タスクバー上からラマを右クリックしてquitさせる

# バージョン確認
c:\ > ollama -v


# 環境PATH
windowsのシステムから、環境変数を起動し、
   OLLAMA_HOST=0.0.0.0:11434
と指定。
 確認はコマンドプロンプトから
c:\ > echo %ollama_host%
   0.0.0.0:11434
で確認できる。

# ファイルの場所
●モデルの実体
 C:\Users\{ユーザ名}\.ollama\models\blobs
●質問履歴
 C:\Users\{ユーザ名}\.ollama\history
●ログ
  C:\Users\{ユーザ名}\AppData\Local\Ollama\app.log アプリケーションログ
  C:\Users\{ユーザ名}\AppData\Local\Ollama\server.log サーバログ